Showing posts with label Set. Show all posts

Wednesday, 18 April 2012

Ss2 - Set modifications,playing with plastercine and newsletter feature!

Modifications made to the set


First this top image is of the set before if you look at the sides its at quiet the right angle to the back wall so i thought it best to see about opening out sides over easter.


This is the after we altered the angle by moving the wooden back holding the wall steady and then changing where its held down, the only tricky part was where the angle meets to make a sharp edge there wouldn't be much chance to change the angle later so went with making two grooves to rest the sides together.


Also when making the set it was going to be held together using biscuit pieces in slots at ninety degree angle but found that would be a bad idea especially when wanting to pull apart but left so holes in the floor so they needed some filler.


Then a touch of paint here and there and any scuff marks sorted out and maybe a little more mud on the floor where the camera didn't see before.


Heres something i made earlier 

Really like this photo
 This little character was a practice with getting a pose that emphasises the characters emotion without being animated.


Over the next few weeks i have many ideas i would like to try out, mainly being better at drawing a character off the top of my head and then being able to model it exact, then move on the taking other peoples styles and making it into a 3d model.


With the hands of the character i was going for more of a square style much like Carl Fredrickson from Disney Pixar's feature film Up, which beings a fragile look more with Carls character a square and stereo typical grumpy Grandad movement.

Might also create different emotions for the same character.
'Street Act' has only got me on the Birmingham City University Newsletter Checkout the feature below

all the hard work is paying off but still not stopping anytime soon!

Saturday, 3 March 2012

Ss2- The Set for 'Street Act' Silent Animation Film

'Street Act' Detail shots of the set 

Centre stage throughout the animation

Lately the blog hasn't been as regular but will be many updates over coming days as i've been too busy to post about work, to start i thought i'd post images of how the set looks finished with all the trimmings, in relation to the brief of the competition there must be an iconic building in the animation or the word Birmingham so i came across 'The Birmingham Post' poster an checked the time period of their publishing and luckily the time fitted.
Then because of many of the people who will be seeing the animation on the published night will more than likely be from Birmingham Corporation st. comes up in the top left and corner of the set and gives more detail of where the animation was set.

Shot taken from the film Coraline
From watching the likes of Coraline for the millionth time there was something about the textures which would come across very nicely with the time period and where set ( on a street corner). The attention to detail with making certain textures visible doing tests in my Rvj was important throughout with the set and will also be evident on the cloths of the Characters.


Busy street in Birmingham Corporation st.

this shot was darker to show the textures on the set.


Drainage pipe on the back wall made from ballsa wood to add unnessesary weight.

Ariel view of set

Back wall in daylight

Monday, 27 February 2012

Ss2- How the set will look black and white shots


Shots of the set in black and white how it'l look 

Finished the walls and the floor today with the walls covered in a wall paper and the floor completely covered in acrylic paint with added texture by dabbing the brush, for the time being to create more atmosphere i've added some small cut up leaves and a drain pipe which will have water at the bottom in the animation.
textured with noise in photoshop


short but sweet more updates tmorrow

Sunday, 5 February 2012

Ss2-The naked set for my next short film.

Being an elf over christmas pays off

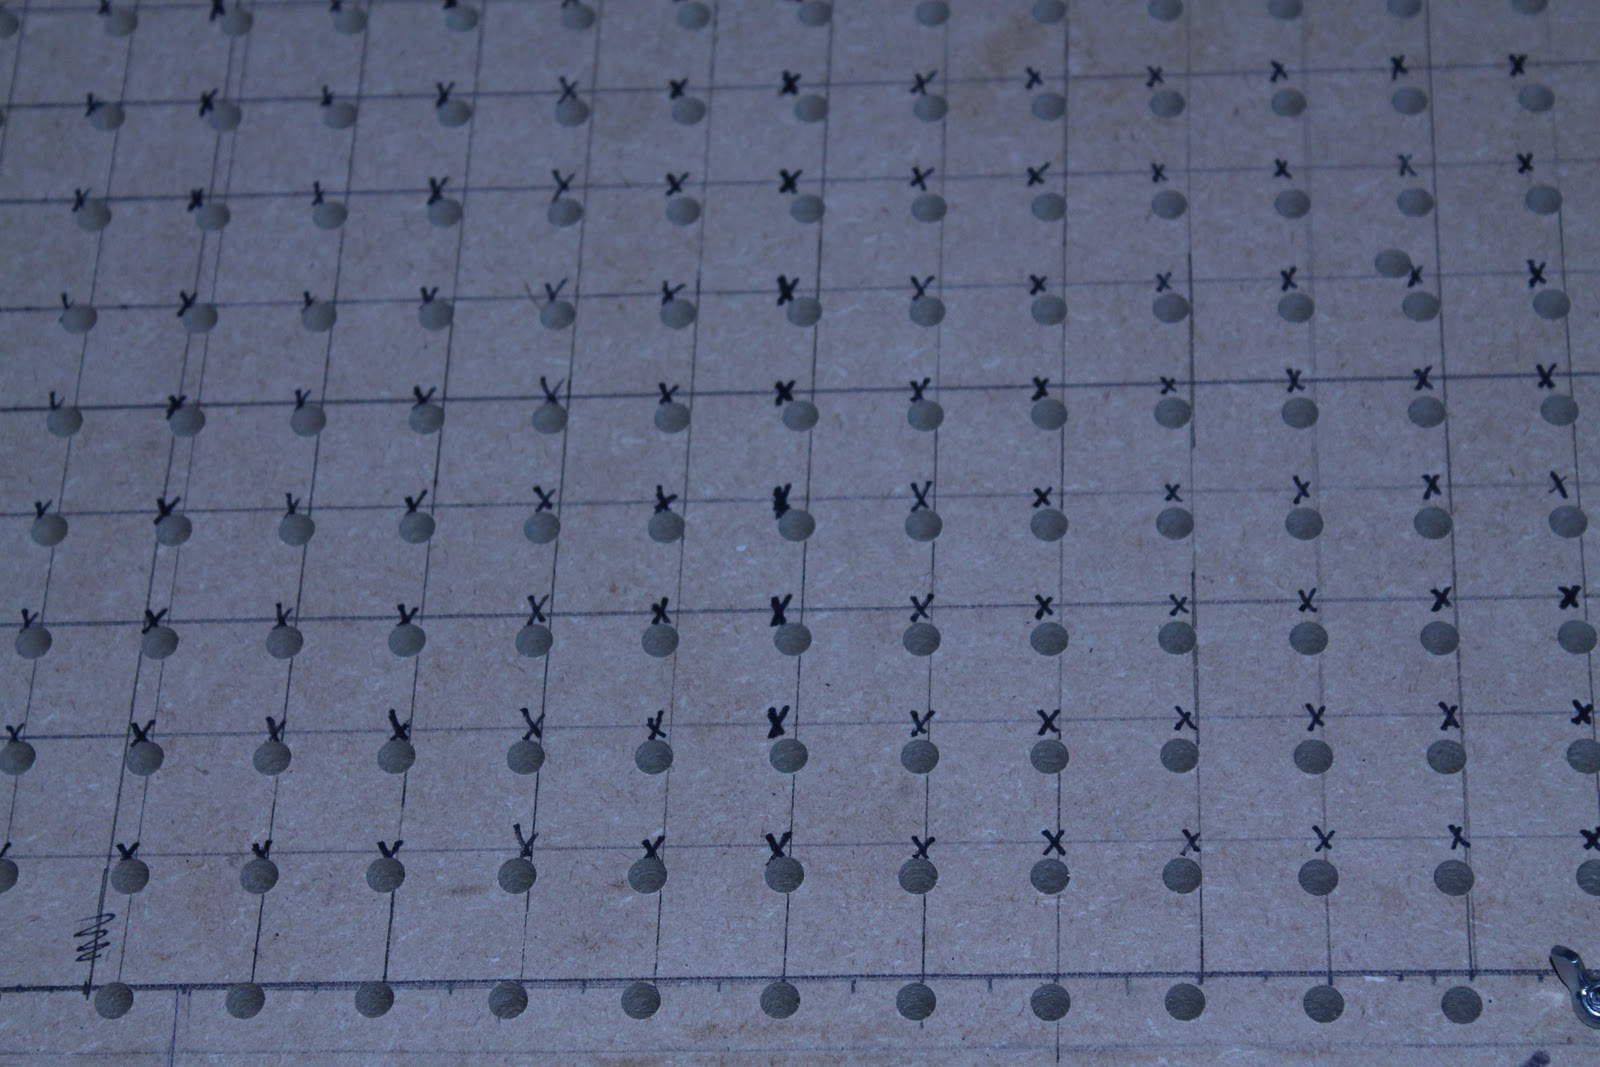
Tie down holes made using Cnc

 These pictures were taken over christmas when the set was made but since then there have been adjustments again, balancing the dissertation and the set was task in itself but with the help of my dad i was able to make the set in a much quicker time.


The design and the measurements were all made before christmas break most of the pieces already cut to size the problem was space to put it and taking it down and up again to take it to Birmingham,after going over the design and making adjustments it all came together.


Then the next task was to make the two side walls able to remove when the shot asks and we over came the problem with the help of Mr Ben Whitehouse and discovering what best way to tackle the problem with mdf shaving two fastens and two magnet type pieces that make sure the walls always go back in the same place.(will explain better next time with photos)

Da DaAAAAR!

The space between the set and the floor is to give enough space to enable tie downs to be used when needs be, i gave 15cm which seems the perfect distance,the separations between the floor and the set are going inwards because of stability issue's feared alone the lines if the set was moved about a lot.

This set will be used in conjunction with my specialist study two project where i am entering a silent film animation competition, the ideas are currently coming along with making starting in the coming weeks the project will be tight to the deadline but surely rewarding. If kept to schedule i should be able to do some short animation snippets once finished as well to show less fast pace action comedy and more subtle.

Tuesday, 8 November 2011

Ss1-Preparation for specialist study 2 set

Ss2-Professional Set
Workshop induction today to be able to get cracking on my set for Specialist study 2 and over the past few days i've been planning how I would benefit with taking extra time to make sure this set will be completely ready for styling and making the set suit all my ideas.

Full size of the base of set.
 
 First thing today after my induction the planning for all the panels to put together the set will be ready tomorrow and will be easy from there to attach the panels and create a much more professional set look.
From there the only thing apart from dressing up the set to suit the narrative would be adding the tie-down holes to use but also would like to make space to be able to move the camera in what angle id like.


Camera angles

This image shows the camera angles i would like to portray easier with the new set, from the angles that have walls im going to see about finding a way of collapsing the walls to make shots that make you feel more into the animation and not have one angle where it may look to straight up,but won't be using them to the extend of making the audience dizzy just ones that need a more professional edge.

Saturday, 5 November 2011

Ss1-Raising the set to get underneath.

Space for Tie Down Rigging
Making the set raised for tie downs, first there was going to be four blocks which were glued together to then be attached to the floor of the set but when testing out moving the rigging there wasn't enough space for the hands to move the tie downs.
  So from there I thought about making the space a lot larger by actually making a separate box underneath the set to give total control to about 15 cm but then with that would make the set higher and less space to bring other rigs into it.
   From that I went back to using blocks but made sure there was a lot more space, going back to the workshop I found a large plank spare so put it on the bandsaw made sure all six pieces were the same six and tested them with the rigging and felt snug as a rug.
Deciding on the spacing and where the hands would need to be coming from.

 First before screwing all the blocks in place after deciding where they were going, to make sure the blocks wouldn't have a chance of moving I added a strong glue,Once dry made space for the screws to be guided to then screw in three spaces through to each block.
Drying onto set floor
space for walls of space
Space underneath for tie down.

Overview
Set walls and character tests with set, more research ready for dissertation and decide on tickets for Bristols animation Festival Encounters.


Thursday, 3 November 2011

Ss1-Problem Puppet and Set Reinventing


Fixing threaded wire into the puppets head
close up on threaded wire

After getting things together, a small job which ended up time consuming because taking out the original wire which was inside the puppets head and changing it to a threaded wire to make more compatible to the armature which is using a ball and socked armature.

workshop area for the day

If you can see the picture you'll see I finally got the job done.

In the end I don't have a picture but I used a dremmel to file down the wire to the width needed to get inside the puppets head which took some time with the wire getting hot every time so ended up having to go over the wire about ten times in the same area.


Organisation is important.


Finding myself looking for armature pieces and eyes on the floor after dropping them became annoying and time consuming,the money I spend on the box saves time in the long run.


Re-thinking set approach & giving tests a place to animate.
 (also less home made more professional)

Floor plan & Rigging.
First picked up some Mdf and drew out spacing for vertical and horizontal.

Realising lines were not matching up added correct measurements with and X.

After measurements aligned correctly

(endless grid)

Ongoing thinking about how the set will be placed together or to be able to pull apart.


To be able get get exact measurements correct and not waste time I used a machine called CNC which with the correct measurements given will take commands from software such as illustrator,Corral and Cad.


Screen grabs of the illustration document 5mm each hole.

Finished and ready to sent to cad then the Cnc machine.


 With the help of splirgion(spelt as said) a workshop technician helped so much in letting me use the CNC machine, the reason for the holes? For the rigging as you'll of noticed I will be using tie downs which consists of connecting an armature with a hole in your set using a nut and bolt.

Holes not in place? CNC took measurements from bottom of Mdf,mine are from the drawn out box.

From the things to get me to this stage I will be using this set as the before set  to test armatures mainly.


Tie down fits perfectly leaving enough room to be able to have not movements in the set when changing position.

Tuesday, 25 October 2011

Ss1-Day before filming

Set all finished.
First here are some pictures of my set-

Left top of set 

Redbull Billboard

The concrete floor (a lot of acrylic)


Birdseye
Final Puppet

Workspace from yesterday.

Final stages of the boy puppet and following principles i learned in the last two puppets and trying to take the best bits and add to them with this third puppet, at first for my final puppet head i was going to use replacement mouths but because i haven't got windows 7 on my laptop the software had some difficulty so i've opted to go back to making a huge jaw and lips instead of lips as also there isn't any lip syncing throughout.
Update

Will be animating tomorrow and so im rushing round with a cold trying to get everything finished, the set is near enough there, the armature just needs another coat of latex and the shoes might need thickening out to improve balance because the magnets are proving not strong enough.

For the eyes on this puppet i will also be trying out some latex eye lids to see how realistic they look if not il make some replacement ones using ether Super Sculpey or plastercine.
tried with some hair made from super sculpey this time. 

mouth left open always looks a lot bigger but good for expression.

no neck, latex later.

material for a scarf on first puppet (with eyes out)